I’ve always believed that the perfect cheesecake should tell a story with every bite, and this Luscious Lemon-Lime Cherry Pistachio Cheesecake does exactly that. My journey with this recipe began during a summer visit to my grandmother’s garden, where the aroma of fresh citrus mingled with the sight of ruby-red cherries hanging heavy on the branches. The addition of pistachios came later, inspired by a trip to a Mediterranean café where I first tasted the magical combination of these flavors.
This isn’t just another cheesecake recipe – it’s a celebration of contrasts that somehow work in perfect harmony. The tangy brightness of lemon and lime cuts through the rich creaminess of the cheese filling, while sweet-tart cherries provide bursts of flavor that dance on your palate. The pistachios add both a delightful crunch and an earthy sophistication that elevates this dessert from simple to extraordinary.
What makes this cheesecake particularly special is how each component enhances the others without overpowering them. I’ve spent countless hours perfecting the balance, adjusting the citrus ratios, testing different cherry preparations, and finding the ideal pistachio incorporation method. The result is a dessert that’s simultaneously refreshing and indulgent, complex yet approachable.
Understanding the Key Components
Cream Cheese Base: The foundation of any exceptional cheesecake lies in using full-fat cream cheese at room temperature. I’ve learned through trial and error that this single factor can make or break your final result.
Citrus Balance: The lemon-lime combination requires precise measurement. Too much lime can overpower the delicate lemon notes, while insufficient citrus leaves the cheesecake flat and one-dimensional.
Cherry Selection: Fresh cherries work beautifully when in season, but I’ve found that high-quality frozen cherries often provide more consistent results and intense flavor concentration.
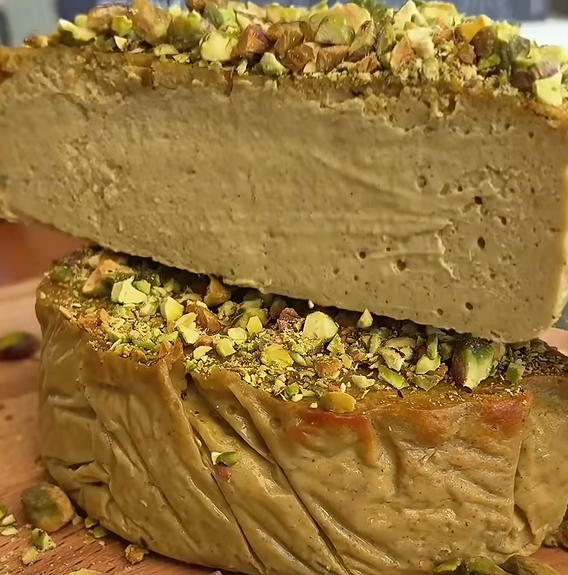
Pistachio Preparation: The key to incorporating pistachios successfully lies in using them in multiple forms – some finely ground for the crust, others chopped for texture, and a few left whole for garnish.
Essential Ingredients and Measurements
| Component | Ingredient | Quantity | Notes |
|---|---|---|---|
| Crust | Graham crackers, crushed | 1½ cups | Use honey graham crackers for extra flavor |
| Pistachios, finely ground | ½ cup | Remove shells completely | |
| Unsalted butter, melted | ⅓ cup | Must be completely melted | |
| Granulated sugar | ¼ cup | Fine grain works best | |
| Salt | Pinch | Enhances overall flavor | |
| Filling | Cream cheese, room temperature | 32 oz (4 packages) | Critical temperature requirement |
| Granulated sugar | 1 cup | Can substitute ¾ cup + ¼ cup powdered | |
| Large eggs | 4 whole | Room temperature preferred | |
| Sour cream | ½ cup | Full-fat only | |
| Heavy cream | ¼ cup | 35% fat content minimum | |
| Fresh lemon juice | 3 tablespoons | Strain to remove pulp | |
| Fresh lime juice | 2 tablespoons | Freshly squeezed essential | |
| Lemon zest | 2 teaspoons | Organic lemons preferred | |
| Lime zest | 1 teaspoon | Avoid bitter white pith | |
| Vanilla extract | 2 teaspoons | Pure extract, not imitation | |
| Cherry Layer | Fresh or frozen cherries | 1½ cups | Pitted and halved |
| Granulated sugar | ⅓ cup | Adjust based on cherry sweetness | |
| Cornstarch | 2 tablespoons | For thickening | |
| Lemon juice | 1 tablespoon | Prevents browning | |
| Garnish | Pistachios, chopped | ½ cup | Roasted for best flavor |
| Whipped cream | 1 cup | Freshly whipped preferred | |
| Fresh cherries | 10-12 whole | For decoration |
Step-by-Step Preparation Process
Preparing the Crust
I always start with the crust because it needs time to set properly. In my food processor, I combine the graham crackers and pistachios, pulsing until I achieve a fine, uniform texture. The mixture should resemble coarse sand with no large pieces remaining.
Next, I melt the butter completely and let it cool slightly before adding it to the crumb mixture along with the sugar and salt. When I press this mixture into my springform pan, I use the bottom of a measuring cup to ensure even distribution and proper compaction. The crust should extend about halfway up the sides of the pan.
I bake the crust at 350°F for exactly 10 minutes, then remove it and let it cool completely while I prepare the filling. This pre-baking step prevents a soggy bottom and ensures the pistachio flavors develop properly.
Creating the Perfect Filling
The secret to my silky smooth filling lies in the preparation technique. I bring all dairy ingredients to room temperature at least two hours before mixing – this cannot be rushed. Cold ingredients create lumps that no amount of mixing can eliminate.
I start by beating the cream cheese alone until it’s completely smooth and fluffy, about 3-4 minutes on medium speed. Then I gradually add the sugar, beating until the mixture is light and airy. Each egg goes in one at a time, with thorough mixing between additions.
The sour cream and heavy cream get folded in gently, followed by all the citrus juices and zests. I taste the mixture at this point and adjust the citrus balance if needed – it should be bright and tangy but not puckering.
Preparing the Cherry Component
For the cherry layer, I prefer to create a light compote that won’t sink to the bottom of the cheesecake. I combine the cherries with sugar and cornstarch in a medium saucepan, adding the lemon juice to maintain their vibrant color.
I cook this mixture over medium heat, stirring gently until the cherries release their juices and the mixture thickens slightly. This process takes about 5-7 minutes. The goal is to create a syrupy consistency that will swirl beautifully through the cheesecake without making it watery.
I let this mixture cool to room temperature before using it. If you’re working with frozen cherries, there’s no need to thaw them first – they’ll release their juices naturally during cooking.
Assembly and Baking Technique
The assembly process requires patience and a gentle touch. I pour half of the cheesecake filling over the cooled crust, spreading it evenly with an offset spatula. Then I dollop spoonfuls of the cherry mixture over this layer, using a knife to create gentle swirls.
I add the remaining cheesecake filling, creating another layer of cherry swirls on top. The key is not to overmix – you want distinct ribbons of cherry throughout the cheesecake, not a uniform pink color.
For baking, I use a water bath method that I’ve refined over years of cheesecake making. I wrap the bottom of my springform pan in heavy-duty aluminum foil, place it in a larger roasting pan, and pour hot water halfway up the sides of the springform pan.
The cheesecake bakes at 325°F for approximately 55-65 minutes. I know it’s done when the center still has a slight jiggle but the edges are set. The internal temperature should reach 150°F when measured with an instant-read thermometer.
Cooling and Setting Process
The cooling process is just as crucial as the baking. I turn off the oven and crack the door open, letting the cheesecake cool gradually for one hour. This prevents the dramatic temperature change that causes cracks.
After the oven cooling period, I remove the cheesecake and let it cool to room temperature before refrigerating. The minimum chilling time is 4 hours, but I prefer to let it set overnight for the best texture and flavor development.
Flavor Profile and Texture Analysis
| Element | Flavor Notes | Texture Contribution | Intensity Level |
|---|---|---|---|
| Lemon | Bright, acidic, floral | Cuts richness, adds moisture | Medium-High |
| Lime | Sharp, tropical, zesty | Enhances creaminess | Medium |
| Cherry | Sweet-tart, fruity, jammy | Provides soft bursts | High |
| Pistachio | Nutty, earthy, buttery | Adds crunch and depth | Low-Medium |
| Cream Cheese | Rich, tangy, smooth | Creates base texture | High |
| Graham Crust | Sweet, honey-like, crispy | Provides textural contrast | Medium |
The finished cheesecake presents a symphony of flavors that unfold in waves. The initial bite delivers the bright citrus notes, immediately followed by the rich creaminess of the cheese filling. The cherry pieces provide sweet bursts that complement rather than compete with the citrus, while the pistachios add subtle nuttiness and delightful textural interest.
Serving Suggestions and Presentation
I’ve found that this cheesecake serves beautifully at slightly cool room temperature, about 30 minutes out of the refrigerator. This allows the flavors to fully develop and the texture to achieve the perfect creamy consistency.
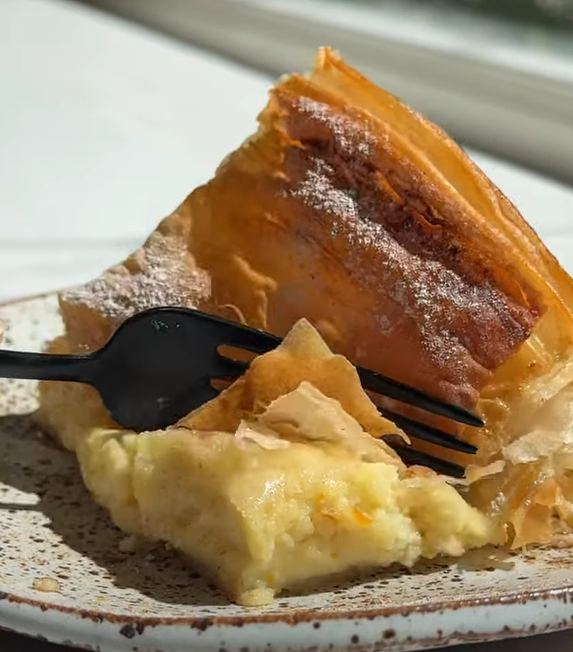
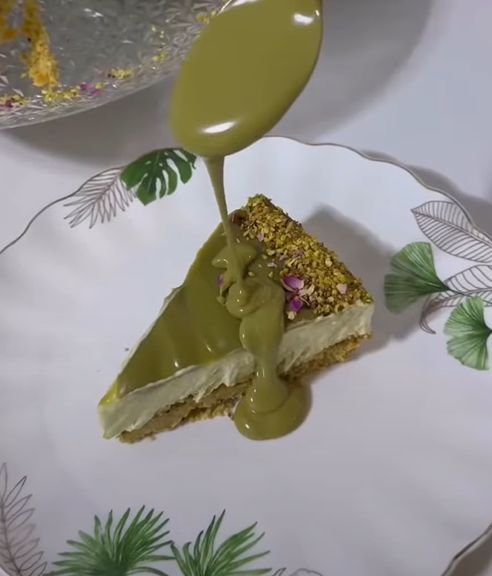
For elegant presentation, I garnish each slice with a dollop of freshly whipped cream, a sprinkle of chopped pistachios, and a fresh cherry on top. The contrast of colors – the pale yellow-green of the cheesecake, the deep red of the cherries, and the vibrant green of the pistachios – creates a visually stunning dessert.
Consider serving alongside fresh berries or a light fruit salad to complement the citrus notes. A cup of Earl Grey tea or a robust coffee provides an excellent beverage pairing that doesn’t compete with the delicate flavors.
For special occasions, I sometimes drizzle a light cherry coulis around the plate or dust the surface with powdered sugar for an extra touch of elegance.
Storage and Make-Ahead Tips
This cheesecake actually improves with time, making it perfect for entertaining. I often make it 2-3 days in advance, as the flavors meld and intensify during refrigeration. Properly stored in the refrigerator, it maintains peak quality for up to one week.
For longer storage, individual slices can be wrapped tightly and frozen for up to three months. I place parchment paper between slices to prevent sticking and wrap the entire package in both plastic wrap and aluminum foil.
When serving frozen slices, I thaw them in the refrigerator overnight rather than at room temperature, which maintains the best texture and prevents condensation from forming on the surface.
Troubleshooting Common Issues
Cracked Surface: Usually caused by rapid temperature changes or overbaking. The water bath method and gradual cooling process I described prevent this issue in most cases.
Grainy Texture: Results from cold ingredients or overmixing. Always ensure all ingredients are at room temperature and mix just until combined.
Soggy Crust: Prevented by pre-baking the crust and ensuring it’s completely cool before adding the filling.
Sunken Center: Typically indicates overbaking or opening the oven door too frequently during baking. Trust the process and resist the urge to check too often.
Nutritional Considerations and Modifications
While this is certainly an indulgent dessert, I’ve experimented with several modifications that maintain the flavor profile while reducing calories or accommodating dietary restrictions.
For a lighter version, I substitute half the cream cheese with Greek yogurt and reduce the sugar by ¼ cup. The texture changes slightly – becoming a bit more tangy and less dense – but the flavor remains excellent.
Gluten-free versions work beautifully by substituting almond flour for the graham crackers in the crust. The pistachio component already provides wonderful flavor and texture, so this modification feels quite natural.
For those watching sugar intake, I’ve successfully used erythritol-based sweeteners, though I recommend reducing the amount by about 25% as these tend to taste sweeter than regular sugar.
Seasonal Variations and Adaptations
The beauty of this recipe lies in its adaptability to seasonal ingredients. During winter months, I sometimes substitute dried cherries that have been rehydrated in warm citrus juice. Spring brings the opportunity to use fresh apricots alongside or instead of cherries.
Summer versions might include fresh berry combinations, while fall adaptations could incorporate cranberries for a festive twist. Each variation maintains the core citrus-pistachio foundation while celebrating seasonal flavors.
I’ve also created mini versions using muffin tins for parties, adjusting the baking time to 18-22 minutes and creating individual desserts that are perfect for entertaining.
Questions and Answers
Q: Can I make this cheesecake without a springform pan? I don’t recommend it for the best results. The springform pan allows for easy removal and clean presentation. If you must use a regular cake pan, line it with parchment paper with overhang for easier removal, though the sides won’t be as neat.
Q: Why do my cherries always sink to the bottom? This happens when the cherry mixture is too liquid or the filling is too thin. Make sure to cook your cherry mixture until it thickens and let it cool completely. Also, ensure your cream cheese filling is thick enough by not overmixing and using full-fat ingredients.
Q: Can I substitute the pistachios with other nuts? Absolutely! Almonds work beautifully and provide a similar texture. Pecans add richness, while hazelnuts contribute a more complex flavor. Just maintain the same proportions and preparation methods.
Q: How do I prevent cracks in my cheesecake? The water bath method is crucial, along with gradual cooling. Never open the oven door during baking, and ensure your oven temperature is accurate with an oven thermometer. Overbaking is the most common cause of cracking.
Q: Can I use bottled lemon and lime juice? While fresh is always best, high-quality bottled juices can work in a pinch. However, you’ll miss the essential oils from the zest, which provide much of the bright citrus flavor. I strongly recommend using fresh citrus for the best results.
Q: What’s the best way to get smooth cream cheese? Remove it from the refrigerator 2-3 hours before using, or cut it into small cubes to speed the process. Never try to soften it in the microwave, as this can create hot spots that lead to lumpy filling.
Q: Can I make this cheesecake dairy-free? Yes, though the texture will be different. Use high-quality vegan cream cheese and substitute coconut cream for the dairy cream. The flavor will be slightly different but still delicious.
Q: How far in advance can I make this? I actually prefer making it 2-3 days ahead as the flavors improve with time. It can be made up to a week in advance and stored properly in the refrigerator.
Q: Why does my cheesecake have a weird aftertaste? This could be from artificial vanilla extract, old cream cheese, or metal bowl reactions with citrus. Always use pure vanilla extract, check expiration dates on dairy products, and use glass or ceramic bowls when possible.
Q: Can I freeze the whole cheesecake? Yes, but wrap it extremely well to prevent freezer burn. I recommend slicing it first and freezing individual pieces for easier serving. Thaw slowly in the refrigerator for best texture.