When I first bit into an authentic Cornish pasty during my travels through Cornwall, I knew I had discovered something truly special. The golden, flaky pastry gave way to a hearty filling of tender beef, potatoes, and vegetables that had been slow-cooked to perfection within its pastry shell. That moment sparked my obsession with mastering this iconic British dish, and after countless attempts and refinements, I’m excited to share the secrets I’ve learned along the way.
The Cornish pasty isn’t just food – it’s a piece of living history wrapped in pastry. Originally created as a portable meal for Cornish tin miners in the 18th century, these hand-held pies were designed to withstand the harsh conditions underground while providing substantial nourishment for hard-working laborers. The thick pastry crust served as both container and utensil, allowing miners to eat their meal without contaminating it with their dirty hands.
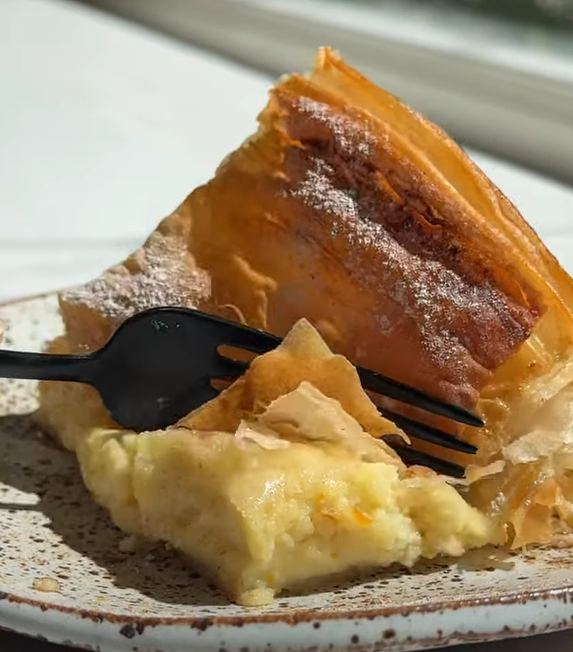
What sets an authentic Cornish pasty apart from other meat pies is its distinctive D-shape, the specific combination of ingredients, and the unique crimping technique that seals the pastry. In 2011, the Cornish pasty received Protected Geographical Indication status from the European Union, meaning that only pasties made in Cornwall using traditional methods and ingredients can legally be called “Cornish pasties.”
Understanding the Authentic Cornish Pasty
Traditional Filling Components:
- Beef skirt or chuck: The protein foundation, typically diced into small, uniform pieces
- Potatoes: Usually waxy varieties that hold their shape during cooking
- Swede (rutabaga): Adds sweetness and texture contrast
- Onions: Provide aromatic base and moisture
- Seasoning: Simple salt and white pepper, sometimes black pepper
The beauty of a genuine Cornish pasty lies in its simplicity. Unlike many modern variations that include carrots, peas, or other vegetables, the traditional recipe calls for just these five basic ingredients. The magic happens during the slow baking process, where the raw ingredients cook together inside the sealed pastry, creating their own flavorful steam and allowing the flavors to meld beautifully.
Essential Ingredients Breakdown
For the Pastry
| Ingredient | Quantity | Purpose | Quality Tips |
|---|---|---|---|
| Plain flour | 500g | Structure foundation | Use strong bread flour for extra gluten |
| Butter | 125g | Flavor and flakiness | Cold, unsalted, high-fat content |
| Lard | 125g | Traditional texture | Or vegetable shortening for vegetarian version |
| Cold water | 150ml | Binding agent | Ice-cold for best texture |
| Salt | 1 tsp | Flavor enhancement | Fine sea salt preferred |
| Egg | 1 large | Glazing | Free-range for best color |
For the Filling
| Ingredient | Quantity (serves 4) | Preparation | Selection Tips |
|---|---|---|---|
| Beef skirt | 400g | Diced 1cm cubes | Well-marbled, avoid lean cuts |
| Potatoes | 300g | Peeled, diced 1cm | Waxy varieties like Charlotte |
| Swede | 200g | Peeled, diced 1cm | Firm, heavy for size |
| Onions | 150g | Finely chopped | White or yellow, strong flavor |
| Salt | 2 tsp | Even seasoning | Adjust to taste |
| White pepper | 1 tsp | Traditional spicing | Freshly ground preferred |

My Perfected Cornish Pasty Method
Creating the Perfect Pastry
The pastry is arguably the most crucial element of a successful Cornish pasty. I’ve found that the combination of butter and lard creates the ideal texture – the butter provides flavor and color, while the lard contributes to the characteristic flaky, short texture that’s essential for authentic results.
Start by sifting the flour and salt into a large mixing bowl. I always keep my fats refrigerated until the last moment, as cold fat is essential for creating those coveted flaky layers. Cut both the butter and lard into small cubes, then rub them into the flour using your fingertips until the mixture resembles fine breadcrumbs with some larger pieces still visible.
The water addition is critical – add it gradually while mixing with a fork, then bring the dough together with your hands. The dough should feel slightly sticky but not wet. If it’s too dry, add water a teaspoon at a time. Wrap the dough in plastic film and refrigerate for at least 30 minutes, though I prefer to let it rest for an hour.
Preparing the Filling
One of the biggest mistakes I see home cooks make is pre-cooking the filling. Traditional Cornish pasties use completely raw ingredients that cook together inside the pastry. This method creates incredibly tender meat and vegetables while allowing all the flavors to concentrate and intensify.
Dice all your vegetables to approximately the same size – about 1cm cubes work perfectly. I learned from a Cornish baker that the vegetables should be small enough to cook through but large enough to maintain their individual textures and flavors. Season the mixture generously with salt and white pepper, tossing everything together in a large bowl.
Assembly Technique
Roll your chilled pastry on a lightly floured surface to about 3mm thickness. Using a dinner plate or large bowl as a template, cut circles approximately 20cm in diameter. I find that re-rolling scraps works fine for pasties, unlike some other pastries.
Place about 150g of filling on one half of each pastry circle, leaving a 2cm border. The filling should form a neat mound without being packed too tightly – the ingredients need space to expand and steam during cooking.
The Crimping Art
The distinctive rope-like crimp along the edge isn’t just decorative – it creates a secure seal that prevents the juices from escaping during baking. Brush the pastry edges with beaten egg, then fold the pastry over the filling to create the characteristic D-shape.
Starting at one end, pinch and twist the pastry edge, working your way around the curve. Each crimp should overlap the previous one slightly, creating a continuous rope pattern. Press firmly to ensure a good seal, but don’t overwork the pastry.
Nutritional Information Comparison
| Component | Per Pasty (approx.) | Daily Value % |
|---|---|---|
| Calories | 650-750 | 32-37% |
| Protein | 25-30g | 50-60% |
| Carbohydrates | 45-55g | 15-18% |
| Fat | 35-45g | 54-69% |
| Fiber | 4-6g | 16-24% |
| Sodium | 800-1000mg | 33-42% |
| Iron | 4-6mg | 22-33% |
| Vitamin C | 15-25mg | 17-28% |
Baking to Perfection
Preheat your oven to 200°C (180°C fan). Place the pasties on a baking tray lined with parchment paper, ensuring they don’t touch each other. Brush the tops with beaten egg for that gorgeous golden finish that makes mouth-watering photos.
The initial high heat creates steam inside the pastry, which is essential for cooking the raw filling. After 15 minutes, reduce the temperature to 160°C and continue baking for 35-40 minutes until the pastry is golden brown and the filling is cooked through.
I always test doneness by inserting a skewer through the pastry into the center of the filling – it should come out hot and the internal temperature should reach 75°C.
Regional Variations and Modern Adaptations
Traditional Regional Differences
| Region | Variation | Key Differences |
|---|---|---|
| West Cornwall | Original recipe | Beef, potato, swede, onion only |
| East Cornwall | Slight modifications | Sometimes includes turnip instead of swede |
| Devon | “Cornish-style” | Often includes carrots and other vegetables |
| Modern adaptations | Creative fillings | Chicken, lamb, vegetarian options |
While purists insist on the traditional beef filling, I’ve experimented with several variations that honor the spirit of the original while accommodating modern tastes and dietary requirements. Lamb and rosemary creates a beautiful flavor combination, while a mixture of root vegetables with strong cheese makes an excellent vegetarian version.
Serving and Storage Suggestions
A proper Cornish pasty needs no accompaniment – it’s a complete meal in itself. However, I enjoy mine with a dollop of English mustard or a simple mixed green salad when serving as a lighter meal. Some people enjoy them with baked beans, though this is more of a modern addition than a traditional pairing.
Fresh pasties are best eaten warm, about 10-15 minutes after coming out of the oven. This allows the filling to settle and the pastry to firm up slightly while remaining tender. If you’re planning a picnic or packed lunch, they’re equally delicious at room temperature.
For storage, wrap cooled pasties individually in aluminum foil and refrigerate for up to three days. They reheat beautifully in a moderate oven (160°C) for about 15 minutes. I don’t recommend microwave reheating as it tends to make the pastry soggy.
Troubleshooting Common Issues
Pastry Problems
Soggy bottom pastry: This usually occurs when the oven temperature is too low or the pasty is placed too high in the oven. Always bake on the lower third of your oven for the first 15 minutes to ensure the bottom crisps properly.
Tough pastry: Overworking the dough or using water that’s too warm causes gluten development, resulting in tough pastry. Keep everything cold and handle the dough minimally.
Leaking juices: Inadequate crimping or overfilling causes leaks. Ensure your seal is complete and don’t be tempted to overstuff the pasties.
Filling Issues
Undercooked vegetables: Large chunks take longer to cook through. Keep your dice small and uniform for even cooking.
Dry filling: The natural juices from the vegetables and meat should provide adequate moisture. If your filling seems dry, your vegetables might be too old or you may have cooked them too long at too high a temperature.
The Cultural Significance
Understanding the cultural importance of the Cornish pasty adds depth to the cooking experience. These weren’t just convenient meals – they represented sustenance, comfort, and community for generations of working families. The wives and mothers who made them took pride in their pastry-making skills, and recipes were passed down through families with carefully guarded secrets.
The miners’ tradition of eating the pasty from the outside in, discarding the thick crust edge that served as a handle, speaks to the practicality that governed every aspect of its creation. Some families would put initials on their pasties to identify them, and different family members might have different fillings in their individual portions.
Questions and Answers
Q: Can I make Cornish pasty pastry ahead of time? Absolutely! I often make my pastry dough up to two days in advance. Wrap it tightly in plastic film and refrigerate. You can also freeze the dough for up to three months – just thaw it overnight in the refrigerator before rolling.
Q: Why do traditional Cornish pasties use raw filling ingredients? The raw filling method allows all the ingredients to cook together, creating incredibly tender meat and vegetables while concentrating the flavors. The sealed pastry creates a steaming environment that cooks everything perfectly while retaining all the natural juices.
Q: What’s the difference between a Cornish pasty and other meat pies? Authentic Cornish pasties have a distinctive D-shape with crimping along one edge, use specific traditional ingredients (beef, potato, swede, onion), and cook raw ingredients inside the pastry. Other meat pies often use pre-cooked fillings and different shapes.
Q: Can I freeze unbaked Cornish pasties? Yes, you can freeze assembled unbaked pasties for up to three months. Place them on a tray to freeze individually, then transfer to freezer bags. Bake directly from frozen, adding an extra 10-15 minutes to the cooking time.
Q: What’s the best way to reheat leftover Cornish pasties? Wrap them in foil and reheat in a 160°C oven for about 15 minutes. This method keeps the pastry crisp while warming the filling through. Avoid microwaving as it makes the pastry soggy.
Q: Why is my pastry tough instead of flaky? Tough pastry usually results from overworking the dough, using water that’s too warm, or not keeping the fats cold enough. Handle the dough minimally and keep all ingredients as cold as possible during preparation.
Q: Can I make vegetarian Cornish pasties? While traditional Cornish pasties contain beef, you can make delicious vegetarian versions using vegetables like carrots, parsnips, and cheese, or plant-based protein alternatives. The cooking method and pastry remain the same.
Q: How do I know when my Cornish pasty is properly cooked? The pastry should be golden brown and crisp, and when you insert a skewer into the center, it should come out hot. The internal temperature should reach 75°C, and you should be able to hear gentle sizzling when you put your ear close to the pasty.
Q: What type of potatoes work best for Cornish pasties? Waxy potatoes like Charlotte, Anya, or new potatoes work best because they hold their shape during the long baking process. Avoid floury potatoes like King Edward or Maris Piper as they tend to break down and become mushy.
Q: Can I use store-bought pastry for Cornish pasties? While homemade pastry gives the best results, you can use good-quality store-bought shortcrust pastry in a pinch. Look for all-butter pastry for the best flavor, and make sure it’s rolled to the right thickness before assembling your pasties.
Creating the perfect Cornish pasty is a skill that develops with practice, but the rewards are immense. There’s something deeply satisfying about pulling a tray of golden, perfectly crimped pasties from your oven, knowing you’ve mastered a technique that connects you to centuries of tradition. Whether you’re packing them for a countryside picnic or serving them as a hearty family dinner, these pasties represent the very best of honest, satisfying food that brings people together around the table.